Toilet commode CAD blocks: reading plan vs elevation
How to read and use plan and elevation views of a toilet commode CAD block together, so the fixture lands correctly in both drawing sets.
Saumyajit MaityUpdated 29 June 20265 min read
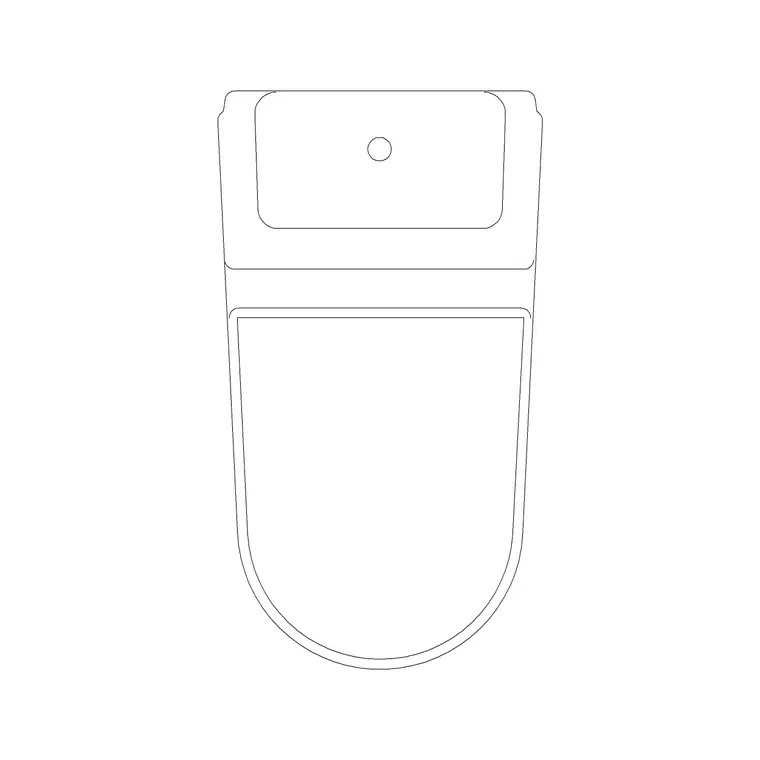
Two views, one fixture, and why beginners mix them up
I still see this trip people up who are new to drafting, they insert a toilet commode block into a plan view drawing and then get confused when the same fixture looks completely different in an interior elevation. It's not a different block that's wrong, it's that a plan and an elevation are two separate orthographic projections of the same physical object, one looking straight down from above, the other looking straight at the wall, and neither one alone tells you everything about the fixture.
toilet-commode-1 on the site is a good example to learn on, it's a straightforward two-piece toilet commode drawn in DWG, sitting in the Bathroom category, and understanding what each view is actually showing you is worth more than memorizing a single dimension.
What the plan view is actually telling you
Looking down at a toilet commode in plan, what you're really seeing is the footprint, the outline of the bowl and tank as they'd appear if you sliced the room horizontally at roughly waist height and looked down. This is the view that matters for clearances, how far the fixture sits from the side wall, how much room is left in front of it for someone to stand or a door to swing, and where the centerline lands relative to a stud wall or a wet wall carrying the soil pipe.
Most commode plan blocks read as roughly 350mm to 400mm wide across the bowl, with the overall footprint including the tank running back somewhere around 600mm to 700mm from the wall, though exact figures vary by manufacturer and model, so treat those as a starting range rather than a fixed spec to design around.
Worth also noting that a squat-style commode, common outside typical Western fixture catalogs, reads completely differently in plan, a shallow raised platform rather than a raised bowl and tank, so if your project brief calls for that fixture type, don't assume a standard two-piece commode block can just be relabeled, pull a block actually drawn for that fixture instead.
What the elevation adds that the plan can't show
The elevation is the view standing in the room looking at the fixture from the side or front, and it's where height actually shows up, seat height off the finished floor, tank height on the wall, and how the fixture relates to a grab bar or a window sill if there's one nearby. None of that is visible in plan, which only shows you the footprint from above.
A lot of fixture schedules and construction sets need both, the plan to confirm the layout works and the elevation to confirm the fixture reads correctly against the wall composition, tile lines, and any fittings mounted above it. If you're only working from the plan block, you're missing half the information a contractor actually needs on site.
Seat height on a standard floor mounted commode typically sits somewhere around 380mm to 430mm off the finished floor for a standard fixture, rising toward 430mm to 460mm for what's often labeled a comfort height or ADA style unit, and that distinction only shows up in the elevation, never in the plan footprint, which is exactly why skipping the elevation view on an accessible bathroom project is a real risk, not just a documentation gap.
Bringing the block into your drawing without breaking the reference
Insert the plan block first and get the footprint and clearances right, since that's the dimension that drives the room layout and can't easily change later without moving walls. Once the plan location is locked, if you need the elevation view for a wall composition drawing or an interior elevation set, treat it as a separate insertion referencing the same wall location rather than trying to derive one view from the other by rotating or extruding it, DWG blocks drawn in 2D don't translate that way.
Check scale on both insertions independently using DIST against a known wall dimension, because plan and elevation blocks are sometimes drawn at slightly different original scales depending on the source file, and assuming they match without checking is how you end up with a commode that's the right width in plan and the wrong height in elevation.
Reading commode variants correctly before you pick one
The catalog carries commode blocks in different configurations, and it's worth actually opening a few before settling on one rather than grabbing the first result. Two-piece units with a separate visible tank read one way in elevation, one-piece units read differently, and if your project calls for a wall-hung commode with a concealed cistern, that's a genuinely different footprint in plan too, since the tank disappears into the wall and the visible fixture shortens.
What I actually do when I'm laying out a bathroom is drop two or three candidate commode blocks into a scratch area of the drawing at the correct scale, compare them side by side against the wall dimension I've got to work with, and only then move the one that fits into the actual plan, rather than committing early and reworking the layout later.
One piece commodes read as a single continuous outline in plan without the visible seam between bowl and tank that a two piece unit shows, and while that distinction barely matters in plan view, it becomes relevant again in elevation, where a one piece unit's lower, more continuous profile can sit differently against a tiled wainscot line than a two piece tank would.
Common mistakes worth catching before they reach the sheet
The most common error is treating the plan block's bounding box as the true clearance zone without adding the code minimum space in front of the fixture for someone to actually sit down and stand up, which is a separate dimension from the fixture footprint itself. The second is inserting an elevation block at the plan's rotation instead of orienting it to face the correct wall, which sounds obvious until you're moving fast through a set and it happens anyway.
The third, and this one costs the most time, is skipping the scale check on the elevation view specifically because the plan already checked out fine. Always verify each view independently, right, it's a small habit that saves a lot of redlines later in the process.
Further reading
Questions
Frequently asked
Do I need both the plan and elevation view of a toilet commode block?+
For a full construction set, yes. The plan drives clearances and layout, the elevation drives wall composition and fixture height, and they answer different questions even though they're the same physical fixture.
Why does the commode look a different size in plan versus elevation?+
They're two separate orthographic projections looking from different directions, so proportions read differently by design. Always verify scale on each view independently against a known dimension rather than assuming they match.
What's a typical clearance to leave in front of a toilet commode in plan?+
Enough space for someone to comfortably sit and stand, which is usually well beyond the bowl's own footprint. Treat the bounding box of the block as the fixture only, not the required clearance zone, and check local code guidance for the actual minimum.
Free downloads from this article
Free CAD block library
Download the blocks from this article — free, no signup

