Pine tree CAD blocks: plan view vs elevation view
How to pick and use pine tree DWG blocks in plan and elevation, with realistic canopy sizes and layer tips for a clean landscape sheet.
Saumyajit MaityUpdated 25 June 20266 min read
Two very different jobs for the same species
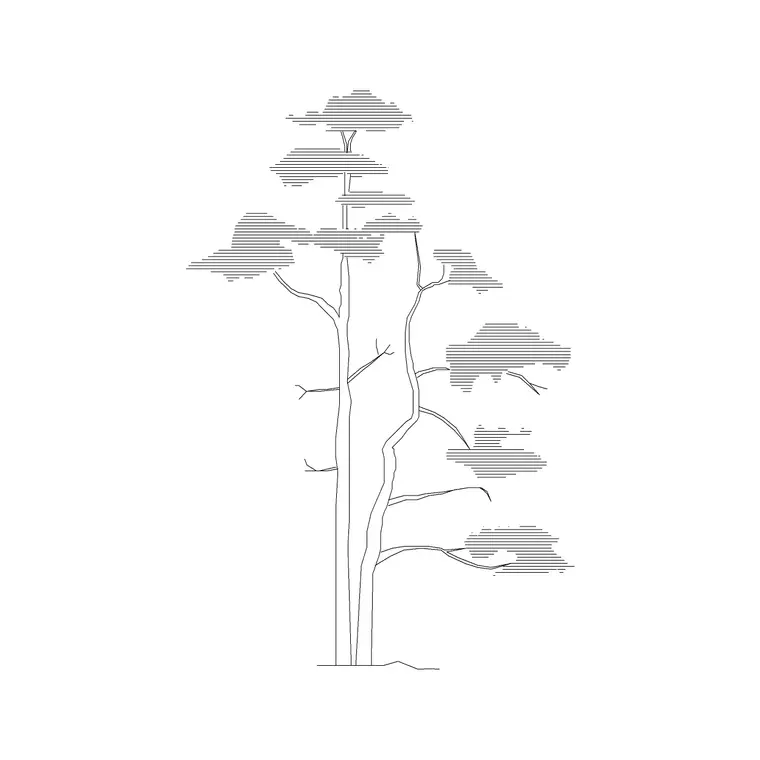
I keep two folders open whenever a landscape sheet has conifers on it, one for plan symbols and one for elevation blocks, and the reason is that a pine tree does two completely different jobs on a drawing set depending on which sheet you're looking at. On the site plan or planting plan, the pine is a top down canopy circle, basically a footprint that tells the reviewer how much ground that tree will shade and how close it sits to a property line or a driveway. On a section or a streetscape elevation, that same pine needs to read as a silhouette, a recognizable conical conifer shape with visible branching texture so a client or a planning officer can actually picture the finished view. Treating both jobs with one block is where a lot of drawings go wrong, so it's worth keeping the two views separate from the start.
A block like Pine Elevation 1 on cadblockdwg.com is built specifically for that second job, the elevation silhouette, and it's meant to sit on a section cut, a streetscape, or a front elevation where you need a believable conifer profile rather than a flat circle.
What you actually get in the download
The pine elevation block ships as a DWG, and because DWG and DXF are just two flavors of the same vector drawing format, you can open it in AutoCAD, BricsCAD, or pretty much any CAD package that reads Autodesk's native format without a conversion step. Inside, the geometry is a side on conifer outline, usually with a bit of internal line work to suggest needle texture and branch layering rather than a flat triangle, which matters a lot once you zoom in on a rendered elevation. There's no foliage fill baked in as a raster image, it's clean vector line work, so you can recolor it, hatch it, or leave it as a line drawing depending on how the rest of your sheet is styled.
What you won't get from an elevation block is a usable plan symbol, and that trips people up constantly. The elevation view shows height and silhouette, not canopy spread from above, so if you drop a pine elevation block into a top down site plan it just looks like a random triangle floating in the planting bed. For the plan side of a landscape sheet you want a genuine top view tree symbol, which on this site lives under the plan view filter in the trees and plants category alongside the elevation blocks.
Realistic sizing for a mature pine
Pine species vary a lot, but for drafting purposes a mature landscape pine, something like a Scots pine or an Austrian pine planted as a specimen tree, is usually drawn with a canopy spread somewhere in the 4 to 8 meter range at maturity, and a mature height that can run anywhere from 10 to 20 meters depending on the cultivar and how much room it's had to grow. Younger nursery stock going into a fresh planting plan is obviously much smaller, often closer to a 1.5 to 3 meter canopy at planting, and that gap between planted size and mature size is exactly why a lot of planting plans show two circles per tree, a solid one for the actual root ball or planted spread and a dashed one for the mature canopy the client should expect in ten or fifteen years.
When you insert the elevation block, don't eyeball the scale, use the INSERT command and type an explicit X and Y scale factor based on the block's native size versus the height you actually want that pine to read at on your elevation, then check it against a human figure block or a door block already on the sheet as a sanity check.
Worth noting too that pines planted in an exposed, wind heavy site, a coastal boundary or an open hillside for example, often develop a noticeably more lopsided, wind shaped canopy than a specimen grown in a sheltered courtyard, which is a detail worth reflecting in your elevation block choice if the site conditions call for it, since a perfectly symmetrical conical pine silhouette can look slightly out of place on a rendering of an exposed coastal site where every other tree on the reference photos leans distinctly away from the prevailing wind. I'll sometimes rotate or lightly skew a pine elevation block for exactly this reason on a coastal project, not because the geometry is wrong, but because a touch of asymmetry reads as more believable once you're looking at the finished streetscape next to photographs of the actual site.
Bringing it into the drawing cleanly
What I actually do when I'm laying out a streetscape elevation is insert the pine block on its own layer, something like L-PLANT-ELEV, well away from LAYER 0, so I can freeze or isolate every conifer independently of the plan symbols and the hardscape. Right after inserting, I run a quick AUDIT and PURGE pass if the block came in with any unreferenced layers or dimension styles riding along, which happens more often than you'd think with blocks pulled from mixed sources. Keep the insertion point at the base of the trunk rather than the center of the canopy, that way when you place it on a section cut or a ground line it sits naturally instead of floating or burying itself below grade.
If you're populating a long streetscape with a row of pines, insert one instance, get the scale and layer right, then array or copy it along the baseline and vary the rotation slightly on a few copies so the row doesn't look like it was stamped out with a cookie cutter, which is a small touch but it's the difference between a drawing that reads as hand-considered and one that reads as generated.
Where plan and elevation meet on the sheet
On a full landscape package you'll typically show the same pine tree in both views on different sheets, the plan view on the planting plan with a scaled canopy circle and a tag calling out the species and size, and the elevation view on a section or a rendered streetscape showing what that tree actually looks like from eye level. Keeping the tag consistent between the two, same species callout, same size class, is what makes a reviewer trust the rest of the set, because nothing undermines a landscape drawing faster than a plan that says one thing and an elevation that shows something else entirely.
The underlying idea here is really just orthographic projection applied to planting design, the same discipline that gives you a floor plan and an elevation of a building gives you a canopy footprint and a tree silhouette for a piece of planting, and once that clicks it's a lot easier to know which block folder you should be pulling from for any given sheet.
Further reading
Questions
Frequently asked
Can I use a pine elevation block as a plan symbol if I just look straight down at it?+
No, an elevation block only has side on geometry, there's no canopy footprint hidden inside it, so for plan views you need a dedicated top view tree symbol from the plan view filter instead.
What canopy size should I draw for a young nursery pine versus a mature one?+
A freshly planted pine is usually drawn closer to a 1.5 to 3 meter spread, while a mature specimen is typically shown in the 4 to 8 meter range, so many planting plans show both a planted circle and a dashed mature canopy circle.
Does the pine block work in both AutoCAD and DXF based software?+
Yes, it's supplied as a DWG which most CAD packages open natively, and since DXF is essentially an open, text based version of the same drawing format, you can export or resave to DXF if your software needs that instead.
Free downloads from this article
Free CAD block library
Download the blocks from this article — free, no signup


