Guitar CAD blocks for a music room or studio layout
Guitar CAD blocks for a music room or home studio elevation, with realistic dimensions, placement, and clearance guidance.
Sumana KumarUpdated 19 May 20265 min read
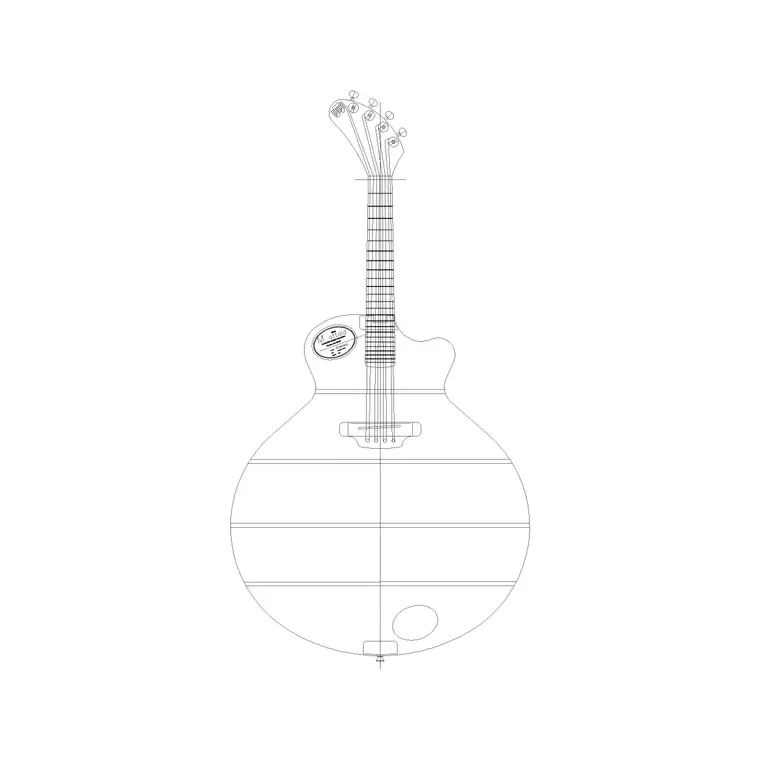
Why a guitar block is more than a nice detail
A guitar shows up in an accessory library more often than you'd think because music rooms, home studios, and even general living spaces with a guitar propped in the corner are common enough briefs that having a dedicated block saves you from awkwardly improvising the silhouette out of arcs and polylines every time. The guitar-front-elevation block does exactly what the name says, it gives you a front elevation view of the instrument body and neck, which is what you actually need for a wall mounted or leaning placement on a room elevation rather than a plan view, which would just be a thin sliver that tells the reviewer almost nothing.
It's also one of those accessories that instantly signals what a room is for, in the same way a treadmill block signals a home gym or a drafting table block signals a studio, so on a mixed use elevation set where you're trying to communicate room function quickly to a client who's flipping through several sheets, a guitar leaning in the corner of a spare bedroom does a lot of that communication work without needing an explicit room label.
Elevation view versus what a studio plan actually needs
For an actual studio layout drawing, plan view matters more for things like where the amp sits, where the mic stand and boom go, and how much floor clearance a musician needs to actually play without knocking into furniture, so the guitar elevation block is really doing styling and wall composition work rather than space planning work. Think of it the way you'd think of a framed picture or a wall clock, it's finishing the elevation rather than defining the functional layout, and the actual clearance and circulation planning happens with your furniture and equipment blocks on the plan.
If the project genuinely is a working studio rather than a styled living space, it's worth pairing the guitar elevation block with actual acoustic treatment representation, absorption panels, bass traps in the corners, because a studio elevation that shows an instrument but no acoustic treatment can read as slightly naive to anyone in the industry reviewing the drawing, even if the treatment itself is being specified separately from the CAD package.
Realistic dimensions for placement and clearance
Dimensionally, a standard acoustic or electric guitar in front elevation runs roughly 950 to 1050 millimeters in total length body to headstock, with the body width typically in the 350 to 400 millimeter range at its widest point, useful numbers to have in your head when checking whether the block has been scaled correctly against a wall or a stand. If you're placing it leaning in a corner, leave clearance of at least the guitar's full length plus a comfortable margin, people do actually walk past these things, and a guitar drawn leaning directly into a doorway swing path is the kind of detail a sharp reviewer will flag even on a styling elevation.
Neck angle is also worth a second look once the block is placed, a guitar leaning against a wall typically rests at a shallow angle rather than perfectly vertical, somewhere in the range of 10 to 20 degrees off plumb depending on how it's propped, and a block inserted at a dead vertical angle can read slightly stiff or unnatural compared to how the instrument actually sits in real life.
Standing, wall mounted, or on a stand
How you position the block changes what it communicates. Wall mounted on a hanger reads as a display piece, deliberate, almost gallery-like, and suits a studio that's presenting itself as a considered space rather than a working mess. Leaning in a corner or against furniture reads more lived in, more like an actual practice space where the instrument gets picked up regularly, and on a stand, which you'd typically represent with a simpler support block alongside the guitar elevation, reads as the most functional, practical option, the choice for a genuine working studio elevation rather than a lifestyle render.
Multiple instruments on one elevation, which does come up on a genuine studio brief with several guitars or a mixed collection, benefit from slight variation in angle and height rather than a uniform row, exactly the same styling logic that applies to picture frame groupings or bottle displays, uniform repetition reads artificial while small natural variation reads convincing.
Building out the rest of the studio elevation around it
Building the rest of the elevation around the guitar block, keep the surrounding accessories restrained, one guitar reads as a considered detail, three or four scattered across a wall starts to look like a music shop display rather than someone's studio. A single framed piece, maybe acoustic panels represented as a simple rectangular hatch pattern on the wall behind it, and enough negative space around the instrument to let it actually read as the focal point, does more for the elevation than crowding the wall with additional accessory blocks.
Lighting context matters too if the elevation is being rendered rather than left as a line drawing, a guitar's finish, whether it reads as a glossy lacquer or a matte satin, changes how much highlight and shadow detail is worth adding to the block, and it's worth checking that against whatever material palette the rest of the room is using so the instrument doesn't look flatter or shinier than everything around it.
Practical drafting notes
Insert with INSERT so the neck and body sit at the correct angle and position relative to your wall, put it on a dedicated instruments or decor layer, and if you're mirroring the block for a different wall orientation, use MIRROR rather than negative scaling, negative scale values on a block reference can behave unpredictably depending on your AutoCAD version and sometimes flip associated text or hatch patterns in ways you don't want.
Finally, if the block is going into a shared office library rather than a one off project file, it's worth renaming the layer and block reference to something searchable, INSTRUMENT-GUITAR rather than a generic BLOCK1 style name, so the next person pulling from that library doesn't have to open and inspect every block individually just to find the one they need. It's a small naming convention, but it compounds quickly across a growing office library, and it's exactly the kind of housekeeping that's easy to skip under deadline pressure yet saves real time for whoever inherits the file months or years down the line.
Further reading
Questions
Frequently asked
Is the guitar block a plan view or elevation view?+
It's a front elevation view, useful for wall mounted or leaning placements on an elevation drawing rather than for space planning on a floor plan.
What clearance should I leave around a leaning guitar in a layout?+
At minimum the instrument's own length plus a comfortable walking margin, and keep it clear of any door swing path so it doesn't become an actual obstruction in the room.
Can I mirror the guitar block for a different orientation?+
Yes, use the MIRROR command rather than a negative X scale on the block reference, which keeps associated hatches and text from flipping unexpectedly depending on your software version.
Free downloads from this article
Free CAD block library
Download the blocks from this article — free, no signup


